Background: Wind is the movement of air. The air moves because of differences in temperature caused by the sun heating the earth. One of the ways children learn that air exists is by seeing evidence of its movement.
In addition to watching the movement of flags and tree leaves, allow children to explore air movement themselves.
Blowing feathers
Gather:
- Feathers or other lights objects, such as bits of tissue (available in craft stores)
- Fan
Give each child a feather or piece of tissue and allow them to blow on it. Let them free explore, seeing how the feathers lift and fly as the air moves. When they are finished, turn on a fan. Allow them to drop their feather in front of the fan. Does the feather move differently? (An actively working air return vent can also work if you don’t have a fan).
If possible, let the children try this outside when there is a breeze.
Windsock/Streamers/Wind chimes
Gather one or more of the following:
- Make or obtain a windsock (see windpower.org)
- Tie a few long streamers of cloth or tissue to a wooden dowel
- Make or obtain some wind chimes
Hang the windsock, streamers or wind chimes outside. Watch them often. Discuss whether the day is windy or calm. Explain that windsocks are found at airports, The pilots need to determine the direction and strength of the wind when they take off and land the planes.
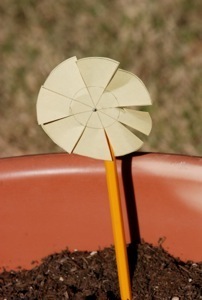
Pinwheel/Windmill
Here’s a way to make a simple pinwheel.
Gather:
- • Heavy paper, card stock or file folder
- • Pencil with eraser
- • Dressmaker’s Pin
- • Drawing compass or circular pattern
- • Ruler
- • Scissors
- • Modeling clay
Draw a circle about three inches in diameter and cut it out of the paper. Find the center of the circle. Draw a line through the center across the circle. The draw another line perpendicular through the center, creating four equal wedge or pie shapes. Now draw two more lines across the center dividing the fourths in half. You will have eight wedge shapes. Cut along each of these lines to about 1/4 inch from the center.
Have and adult place the pin through the center of the pinwheel and push into the side of the pencil eraser. The pencil will be the handle. Be careful with the pin around small children. Play the modeling clay over the sharp end of the pin to hold it in place. Now gently bend one corner down on each wedge, making sure to create the same angle with each.
Blow on your pinwheel or push it through the air holding the pencil. It should spin as the air hits it.